
Creating an APK—Android Package—file is more than just a technical requirement; it’s the bridge that connects your creative coding efforts to a global audience via app stores like Google Play. Without successfully building an APK, your app remains a hidden gem, far from the reach of potential users and opportunities.
Whether you are an independent developer eager to share your apps with the world or a part of a business looking to penetrate the mobile market, creating an APK is essential. In this guide about How To Create APK In Android Studio, you won’t just read the steps; you’ll experience the APK creation process as if you were walking through it in real time, leaving you fully equipped to turn your code into a publishable app.
Things to Keep in mind before starting the APK Creation Process
Before diving into How To Create APK In Android Studio, setting up your workspace with all the essential tools and resources is crucial. First and foremost, make sure you have a functional Android application. It sounds simple, but your app should compile without errors and run smoothly on an emulator or Android device. Any glitches at this stage can result in a faulty APK, so it’s worth double-checking.
Software Requirements
In this guide on How To Create APK In Android Studio, now let’s talk about the software:
Open Android Studio and navigate to Help > About to check your current version. If it’s outdated, you’ll typically get a prompt to download the latest version upon launching the software. For JDK, you can confirm its presence via the terminal or command prompt by typing java -version.
Unique Insight
Statista said over 3 million apps were available on the Google Play Store as of 2021. This emphasizes the significance of the APK creation process, as it’s the gateway for your app to stand out among the multitude of offerings.
Opening Your Project
Once your workspace is set up and you’re equipped with the necessary software, the next natural step is to open your Android project in Android Studio. Whether starting from scratch or revising an old project, opening it correctly is the foundation for successful APK creation.
Steps to Open Your Existing/New Android Project in Android Studio
When you launch Android Studio, you are presented with a welcome screen offering a few options. Here’s how to get started;
1. Click the “Open an existing Android Studio project” Tab
2. Navigate to the directory where your project is stored
3. Select the project folder, usually identifiable by a blue Android Studio icon
4. Click “OK,” and Android Studio will load the project
1. Select “Start a new Android Studio project”
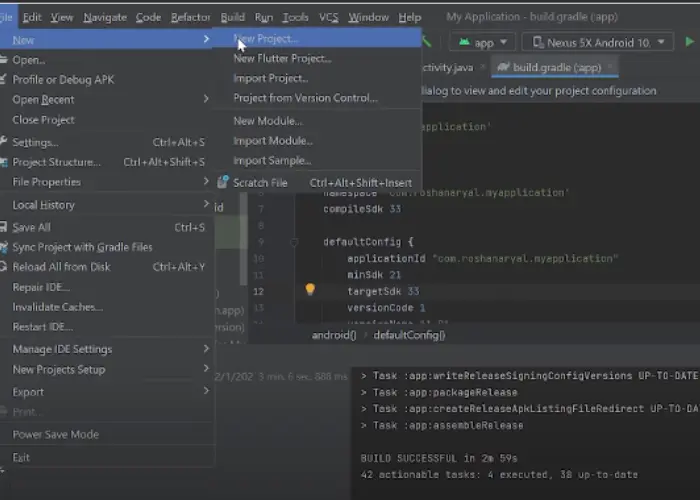
2. You’ll be guided through a series of prompts to configure your new app, like choosing the type of activity to use
3. Click “Finish” to create the new project once selected
Wait for the Android Studio build process to complete, which usually involves downloading the necessary dependencies and initializing your workspace. Once that’s done, you’ll see your project files in the side panel, and you’re officially ready to dive into APK creation.
Updating Gradle Build Configuration
When converting your Android project to an APK file, updating your Gradle build configuration is commonly overlooked but essential. Gradle is the backbone that manages your project’s build process, and keeping it updated can save you from some potential pitfalls.
Importance of Updating Gradle and Its Impact on APK Creation
Why bother updating Gradle? Does the current configuration need to be better? The short answer is an outdated Gradle can throw your entire APK creation process off the rails. Here’s why it’s essential to update:
Updating your Gradle is more than just a best practice; ensuring a smooth and secure APK creation process is essential.
To update Gradle in Android Studio, navigate to File > Project Structure > Project, and you’ll see the option to update your Gradle plugin to the recommended version. Once updated, sync your project with the Gradle files by clicking on the ‘Sync Now’ prompt at the top of Android Studio.
Setting Up Build Variants
After ensuring that your Gradle is up to date, the next crucial stage in How To Create APK In Android Studio is setting up build variants. Build variants allow you to create different app versions from a single project. For instance, you may want a ‘debug’ version for testing and a ‘release’ version for publishing to the Google Play Store.
Description of Build Variants Like Debug and Release
Build variants are different configurations for building your app.
Understanding these build variants is vital as they directly impact the functionality and security of your APK.
Steps to Set Up a Build Variant
Setting up a build variant in Android Studio is straightforward. Here’s how to do it:
1. Open your project in Android Studio
2. Locate the ‘Build Variants’ tab in the workspace’s bottom-left corner
3. Click on it to reveal a panel with a dropdown menu for each of your project’s modules
Unique Insight
According to Sensor Tower, app downloads from the Google Play Store reached over 108 billion in 2020. This staggering number showcases the immense potential for your app to reach a global audience through proper APK creation and distribution.
4. Select the desired build variant from the dropdown list. Depending on your project configuration, you typically have options like ‘debug’ and ‘release,’ among others
Remember, changing the build variant will trigger a project sync, and Android Studio will rebuild your app according to the selected variant’s settings.
Signing the APK
Before your app hits the Google Play Store or any other distribution platform, consider one crucial step to signing your APK. This step acts as a security gatekeeper, ensuring the integrity of your app and building trust with your end users.
Explanation of Why Signing an APK is Crucial
An unsigned APK is a bit like an unknown package — it raises red flags and questions about its origin and security. Signing your APK gives it a unique, secure identity, proving it hasn’t been tampered with since its creation. This is not just a formality but a security imperative. Google Play Store will also not allow the upload of unsigned APK.
How to Generate a Signing Key
Generating a signing key is a one-time process you can easily accomplish within Android Studio. Here’s a step-by-step guide:
1. Go to Build > Generate Signed Bundle / APK in the top menu
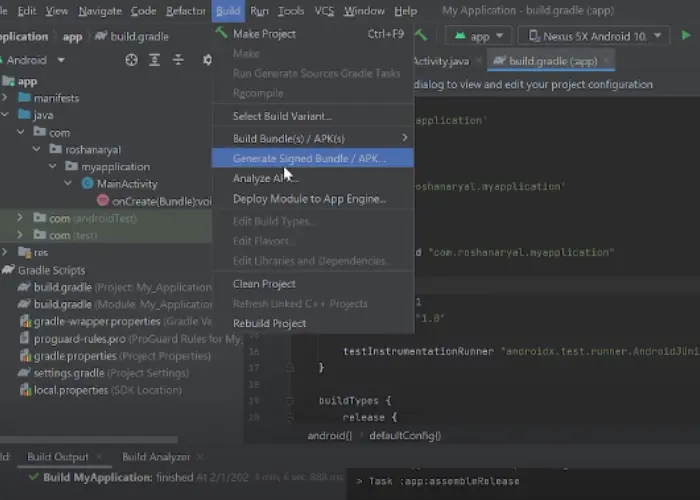
2. Choose APK and click Next
3. If you already have a key, you can import it here. To make a new one, click on Create New
4. Fill in the required details in the new critical store dialogue, including the vital and passwords for both the key store and key alias
5. Click OK to generate your new signing key
After generating your key, you can use it to sign your APK. Note that you should keep this key in a safe location, as losing it will prevent you from releasing updates to your app on the Google Play Store.
Building the APK
You’ve navigated through setting up your environment, opening your project, updating Gradle, configuring build variants, and signing your APK. It’s time to put it all together and build the APK. This is the perfection of your Android development symphony, where all the individual pieces merge to create a cohesive output.
Detailed Steps to Build the APK in Android Studio
To build your APK, follow these steps within your Android Studio workspace:
1. Make sure your project has no errors. The Logcat at the bottom should be free of red lines
2. Select the appropriate build variant. Usually, you’ll want to switch to the ‘release’ variant for the APK you intend to publish
3. Go to Build in the top menu and select Generate Signed Bundle / APK
4. Choose APK and click Next
5. Here, you’ll need to use your signing key. If you’ve just generated one, it should be pre-filled. You’ll need to locate and import it if you still need to
6. Select the V1 (Jar Signature) and V2 (Full APK Signature) options for compatibility and security
7. Click Finish
Android Studio will now build your APK, which might take a few minutes, depending on your project’s complexity. Once completed, a notification will appear, offering to locate or analyze the APK.
Verifying the Build
After building the APK, it’s a good practice to verify it before distributing:
1. Locate your APK file in the project directory, typically under app/release/.
2. Install it on an actual Android device or an emulator. You can drag and drop the APK into the emulator or use the adb install command for real devices.
3. Test your app rigorously to ensure that it behaves as expected.
It’s also advisable to run the built APK through Android’s lint utility to catch potential issues or vulnerabilities.
Locating the APK File
After the joy of successfully building your APK, a more practical concern may soon arise: Where is the APK file located? You’ll need to find this file to distribute your app through the Google Play Store or other platforms. Finding your APK is straightforward once you know where to look.
How and Where to Find the APK File After Building
Android Studio usually stores the generated APK in your project’s folder hierarchy, so you won’t have to dig too deep into your computer’s file system to find it. Here are the steps to find your APK:
1. Open your Android Studio project if it still needs to be opened
2. In the Project pane on the left, switch the view from Android to Project. This will show you the actual folder structure of your project
3. Navigate through the folder hierarchy: YourProjectName > app > build > outputs > APK
4. Inside the APK folder, you’ll find subfolders usually named debug and release, depending on your generated build variants
5. Locate your APK inside the appropriate subfolder. For instance, if you’ve built a release variant, you’ll find it under the release subfolder
You can then right-click on the APK file and choose to reveal it in your computer’s file explorer for easier access. You can directly upload it to your desired destination within this folder.
| Step | Description |
| 1. Pre-requisites | Ensure you have a functional Android application and the required software installed, including Android Studio and the Java Development Kit (JDK). |
| 2. Opening Your Project | Open your existing or new Android project in Android Studio to prepare for APK creation. |
| 3. Updating Gradle Build Configuration | Keep your Gradle updated for compatibility and better performance during APK creation. |
| 4. Setting Up Build Variants | Choose between ‘debug’ and ‘release’ variants based on your app’s testing and publishing needs. |
| 5. Signing the APK | Generate a secure signing key and apply it to your APK for integrity and identification purposes. |
| 6. Building the APK | Use Android Studio to build your APK, following the appropriate build variant settings. |
| 7. Locating the APK File | Find your generated APK in your project’s folder hierarchy, usually under app/release/. |
| 8. Testing the APK | Install and run the APK on real devices or emulators to ensure functionality and compatibility. |
Testing the APK
You have created your APK and have it on your system. Before releasing it to the world, there’s one crucial step you shouldn’t skip — testing. Rigorous testing ensures that your app works as intended and is free of bugs or other issues that could affect user experience or security.
Installing and Running the APK on an Android Device or Emulator
After building your APK, testing it in a real-world scenario, either on an actual Android device or an emulator, is essential. This will give you confidence that your app performs as expected. Here’s how to go about it:
1. Link your Android device to your computer through USB
2. Enable ‘USB Debugging’ on your device by going to Settings > Developer options. If ‘Developer options’ is not visible, you can make it appear by going to Settings > About Phone and tapping the Build number several times.
3. Use the adb install command to install your APK. Open a terminal and navigate to the folder where your APK is located, then run adb install YourAppName.apk
1. Open the emulator from Android Studio by going to Tools > AVD Manager and launching your preferred virtual device
2. Drag and drop the APK file onto the emulator screen. The emulator will automatically install and launch your app
After installing:
1. Find your app in the device’s app drawer and launch it
2. Engage with your app like an end user, going through every functionality, feature, and flow
3. Note any problems, errors, or inconveniences you encounter
Consider revisiting and fixing these areas before a public release.
Statistical Data
According to Google’s Android Developer Dashboard, Android 10 (API level 29) was the most widely used Android version in June 2021, with a 41.2% distribution among devices. This data underscores the importance of ensuring compatibility with different Android versions during your testing phase.
Tips for Efficient APK Creation
Read our latest blog
Conclusion
In this comprehensive guide on how to create APK In Android Studio , we’ve navigated the critical process of creating an APK in Android Studio, from understanding the necessary conditions and opening your project to building, signing, and testing your APK. Each step is essential, whether making sure your Gradle configuration is updated or carefully configuring build variants to meet your needs. The signing step adds a security layer, verifying that the APK is yours and hasn’t been tampered with. APK detection and rigorous testing ensure your app is ready for public release, free of glaring issues or security risks.